For a car that sees both the road and the track, ceramic pads are a game of mastering compromises, not a simple upgrade.
- They offer significant quality-of-life wins for road use (cleaner wheels, no noise) and reduce long-term costs by saving your expensive rotors.
- They demand a change in driving habit, especially on the first cold stop, and their ultimate high-temperature performance can be lower than dedicated track metallics.
Recommendation: If your performance car is 90% daily driver and 10% track day hero, the benefits of ceramics justify the cost. If it’s a dedicated track weapon, stick with aggressive semi-metallics and accept the dust and noise.
The prep list for a track day at Silverstone is a familiar ritual. Tires checked, fluids topped, and the eternal debate over upgrades echoes in every garage. Among the most common questions is the one about brakes. You’ve heard the talk: “You’ve got to get ceramic pads.” They’re often pitched as the ultimate solution—a magic bullet that provides superior performance without any of the drawbacks of traditional semi-metallic pads. They promise less dust, silent operation, and incredible stopping power.
But as any seasoned mechanic will tell you, there’s no such thing as a free lunch in performance engineering. Every component choice is a trade-off. The real question isn’t whether ceramic pads are “better,” but rather: what are you gaining, and what are you giving up? The true art of building a capable track and road car lies in understanding and mastering these compromises, whether it’s in your braking system, your car’s aerodynamics, or its powertrain technology.
This guide moves beyond the sales pitch. We’re going to dissect the real-world performance of ceramic pads from a mechanic’s perspective. We’ll look at the science behind the dust, the reason for the silence, the truth about the dreaded “cold bite,” and whether the cost can ever be justified. We’ll even see how this philosophy of trade-offs extends to the highest levels of motorsport, shaping everything from F1 wings to the very design of next-generation electric vehicles. It’s time to get under the skin of performance technology.
This article dives deep into the critical questions you should be asking before making any changes to your braking system. We will explore the specific advantages and disadvantages to help you make an informed, performance-driven decision.
Summary: Are Ceramic Brake Pads Worth the Upgrade for Your Track Day Car?
- How to Keep Your White Alloys Clean for Weeks with Ceramic Pads?
- How to Stop Your Performance Brakes from Squealing in Traffic?
- Do Ceramic Pads Last Long Enough to Justify the 50% Price Hike?
- The Cold Bite Risk: Why Ceramic Pads Can Be Scary on the First Stop?
- How to Visually Inspect Pad Thickness When Sensors Melt on Track?
- Why 800V Systems Make Cars Lighter and More Agile on British B-Roads?
- Monza vs Monaco: Why Wings Look Completely Different on These Tracks?
- Why F1 Cars Create ‘Dirty Air’ That Ruins Overtaking?
How to Keep Your White Alloys Clean for Weeks with Ceramic Pads?
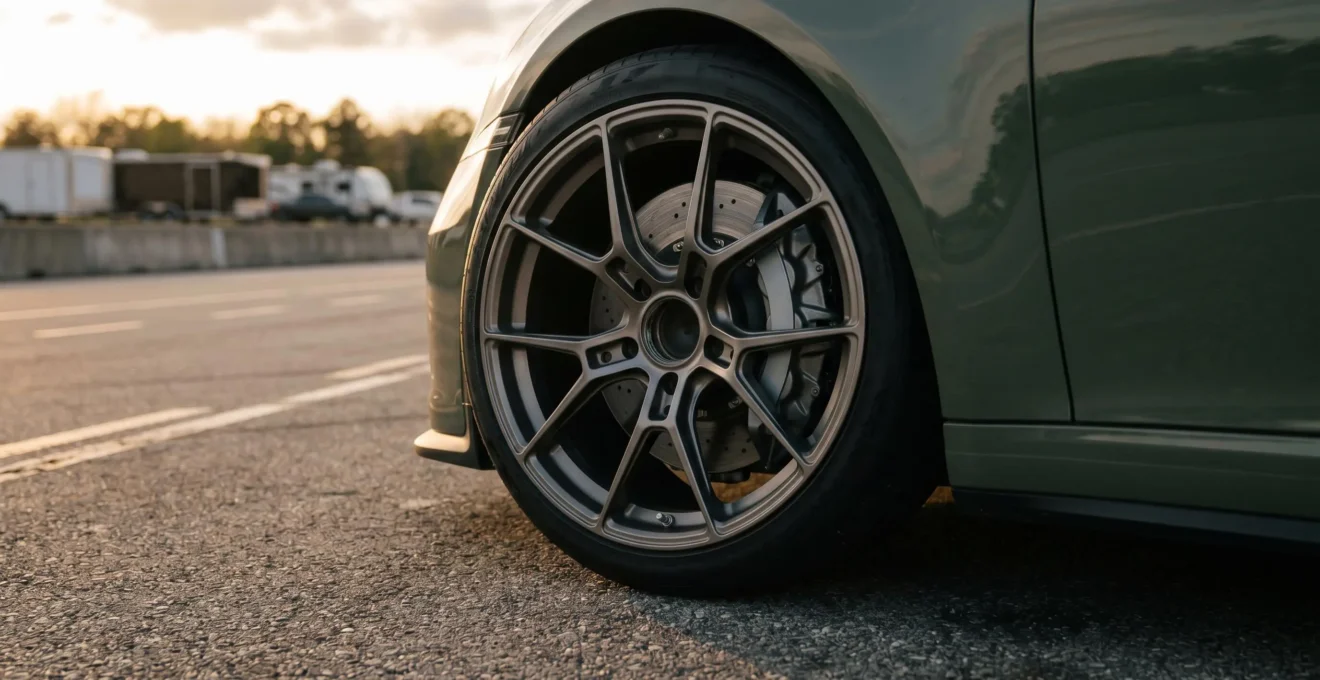
Let’s be honest, a huge part of the pride in a performance car is how it looks. And nothing ruins the aesthetic of a set of pristine white alloy wheels faster than a thick, grimy coat of black brake dust. This is the first and most visible win for ceramic pads. The difference isn’t just slight; it’s transformative. While semi-metallic pads shed a heavy, dark, and sticky dust, ceramic pads produce a much finer, lighter-colored powder in far smaller quantities. In fact, objective testing shows a 30-50% reduction in visible wheel contamination with ceramic compounds.
But why is the dust from semi-metallic pads so much worse? It’s down to the material science. As EBC Brakes Technical Research explains, the issue is the composition: “Iron dust from semi-metallic pads exhibits magnetic properties that cause natural attraction to alloy wheels through chemical reactivity, magnetic attraction, and electrostatic forces.” In simple terms, the metallic dust is actively drawn to and bonds with your wheel surface, making it difficult to clean. The ceramic dust, lacking this high iron content, mostly just blows away in the wind, leaving your wheels looking cleaner for much, much longer. This is a huge quality-of-life improvement for any owner who values a clean car.
How to Stop Your Performance Brakes from Squealing in Traffic?
The sound is unmistakable: the high-pitched squeal of performance brakes echoing through a quiet street as you crawl in traffic. It’s the trade-off many enthusiasts accept for superior stopping power. The noise is caused by high-frequency vibrations between the pad, the caliper, and the rotor. Aggressive semi-metallic pads, with their hard, iron-rich compounds, are notorious for generating these vibrations, especially at low speeds and light pedal pressures where they aren’t in their ideal operating temperature range.
This is where ceramic pads offer another significant advantage in civility. The R1 Concepts Technical Team notes, “Ceramic brake pads are generally quieter than semi-metallic pads because the dense ceramic fiber compound naturally dampens vibration.” The material itself acts as an insulator for noise. The ceramic fibers and non-ferrous fillers are less rigid than steel strands, absorbing the micro-vibrations that would otherwise manifest as audible squeal. This makes them far more pleasant for a car that serves double duty as a daily driver.
However, technique still matters. To ensure silent operation, proper bedding-in is critical. This process transfers an even layer of friction material to the brake rotor, creating a perfect mating surface. Furthermore, always use a high-temperature brake grease on the back of the pads and on the caliper contact points (never on the pad surface itself!) to provide an additional layer of vibration damping. For a dual-use car, this acoustic comfort is a major point in the ceramic column.
Do Ceramic Pads Last Long Enough to Justify the 50% Price Hike?
The initial sticker shock is real. A set of quality ceramic pads can easily cost 50% more than their semi-metallic counterparts. For many, this is where the conversation ends. But looking only at the upfront cost is a rookie mistake. The true financial picture requires looking at the total cost of ownership for the entire braking system, which includes not just pads, but also your expensive brake rotors.
First, the pads themselves last longer. Under normal driving conditions, research indicates that drivers report 30% to 50% longer service intervals with ceramic pads compared to OEM or semi-metallic equivalents. For a daily-driven car, this alone can start to close the cost gap. But the real secret to their long-term value is how they treat your rotors.
Case Study: Rotor Longevity
Aggressive semi-metallic track pads are designed to bite hard into the rotor, which generates incredible friction but also acts like sandpaper on the rotor surface. A comparative analysis revealed that ceramic pads caused significantly less rotor wear due to their smoother, less abrasive composition. Testing showed their gentler friction characteristics allowed rotors to survive two to three pad replacement cycles, compared to just one cycle with aggressive semi-metallic pads. This effectively cuts your rotor replacement costs by half or even two-thirds over the life of the vehicle, far outweighing the initial premium paid for the pads.
So, do they justify the price hike? If you factor in the reduced frequency of pad and rotor replacement, and the labor costs associated with those jobs, the answer is a definitive yes for any car that sees significant road mileage. It’s an investment in lowering the long-term running costs of your braking system.
The Cold Bite Risk: Why Ceramic Pads Can Be Scary on the First Stop?
This is the single biggest performance trade-off and the one that every driver must understand before making the switch. You roll out of your driveway on a cold morning, approach the first stop sign, press the brake pedal as you normally would… and for a heart-stopping moment, it feels like nothing is happening. This is “cold bite” risk, and it’s a real characteristic of many performance ceramic compounds. They are designed to work best when hot, and their effectiveness can be significantly reduced at ambient temperatures.
The science lies in the material’s “friction coefficient,” which is a measure of its stopping power. While semi-metallic pads have a relatively stable friction coefficient from cold, ceramics need heat to reach their peak. For example, dynamometer testing shows some ceramic pads maintain a stable 0.38-0.42 friction coefficient, but only within a specific operating window, often starting from 100°C. Below that temperature, the friction coefficient is lower, meaning you need more pedal pressure to achieve the same stopping force.
This doesn’t mean the brakes fail; it just means they behave differently. The solution is to adjust your driving style. On your first couple of stops when leaving home, or after a long period of cruising on the motorway without braking, you need to be consciously gentle with the first application to build a little heat into the system. One or two light applications are all it takes to bring them into their effective temperature range. It’s a manageable characteristic, not a fatal flaw, but ignoring it can certainly be unnerving. For a dedicated track car that is always warmed up, this is a non-issue. For a dual-use car, it’s a critical habit to learn.
How to Visually Inspect Pad Thickness When Sensors Melt on Track?
On a modern road car, a dashboard light conveniently tells you when your brake pads are low. This is thanks to a small electronic wear sensor embedded in the pad material. When the pad wears down, the sensor makes contact with the rotor, completes a circuit, and triggers the warning. On a track day, this system is worse than useless. The extreme heat generated during heavy braking can easily exceed 500-600°C, which simply melts the plastic sensor and its wiring, rendering it inoperable. You’re flying blind.
This is where old-school mechanical know-how becomes essential. As a driver, you are responsible for monitoring your equipment, and that means knowing how to perform a visual inspection of your pad life. You don’t want your first indication of worn pads to be the grinding sound of the metal backing plate chewing into your rotor. Fortunately, you can do a quick and effective check without even taking the wheel off.
Your Action Plan: Visual Pad Check at the Track
- Expose the Caliper: Turn your steering wheel to the full lock position. This angles the front wheel and opens up a clear view of the brake caliper assembly through the spokes of your alloy wheel.
- Illuminate the Area: Use a high-intensity flashlight (your phone’s torch works well) and shine it through the caliper’s inspection window or between the wheel spokes to light up the pad and rotor.
- Measure the Material: Look for the two main parts of the brake pad: the thick metal backing plate and the friction material bonded to it. You need to estimate the thickness of the friction material. A minimum safe thickness for track use is generally considered to be 3-4mm.
- Check the Rotor: While you’re there, examine the rotor surface. Are there deep grooves or a pronounced “lip” on the outer edge? This can indicate uneven wear or that the pad is dangerously close to its end of life.
- Use a Gauge for Precision: For more accurate tracking between sessions, invest in a specialized brake pad thickness gauge. This small tool can be inserted into the caliper gap to give a precise measurement in millimeters.
Making this check a part of your routine before each track session is a non-negotiable part of responsible performance driving. It prevents costly damage and ensures your brakes will be there for you when you need them most.
Why 800V Systems Make Cars Lighter and More Agile on British B-Roads?
Pivoting from the mechanical world of brakes to the electrical, we find the same engineering philosophy at play: every choice is a trade-off designed to solve a problem. In the world of high-performance electric vehicles, a major challenge is weight. Batteries are heavy, and heavy cars are not agile. A key innovation to combat this is the move from traditional 400-volt systems to 800-volt architectures.
The physics are straightforward and elegant. Power (in Watts) is the product of Voltage (in Volts) and Current (in Amperes), or P=V*I. This means that to deliver the same amount of power to the motors, if you double the voltage (from 400V to 800V), you can halve the current. And this is the crucial part: the amount of current dictates how thick the copper wiring in the car needs to be. Higher current requires thick, heavy, and expensive cables to manage the flow and the heat.
By running at a lower current, an 800V system allows engineers to use significantly thinner and lighter cables throughout the entire vehicle. This might sound like a small saving, but when you consider the sheer length of high-voltage cabling in an EV, it adds up to a significant weight reduction. This reduction in “unsprung” and overall mass directly contributes to a car feeling more nimble and responsive. On a tight, twisting British B-road, that reduced inertia is the difference between a car that feels heavy and one that feels eager to turn in and change direction. It’s a perfect example of how a clever electrical engineering choice translates directly into a tangible improvement in mechanical driving dynamics.
Key takeaways
- Ceramic pads offer a huge road-use advantage with minimal dust and noise, but this comes at the cost of reduced initial bite when cold.
- While the upfront cost is higher, ceramics save money in the long run by significantly extending the life of expensive brake rotors.
- The “best” brake pad is always application-specific. The ideal choice for a daily driver is different from a dedicated track car, demonstrating the core principle of engineering trade-offs.
Monza vs Monaco: Why Wings Look Completely Different on These Tracks?
Nowhere is the philosophy of “compromise engineering” more visible than in the world of Formula 1 aerodynamics. If you look at an F1 car set up for the Monaco Grand Prix and compare it to one prepared for Monza, you might think you’re looking at two different machines, and it all comes down to the wings. The reason is a fundamental trade-off between two opposing forces: downforce and drag.
Monaco is a slow, tight, and twisty street circuit. The average speed is low, and the corners are relentless. Here, the single most important factor for a fast lap time is grip in the corners. To achieve this, teams fit their cars with the largest, most aggressive wings possible. These “high-downforce” packages use steep wing angles to force the car onto the track, generating immense aerodynamic grip that allows drivers to carry incredible speed through the corners. The penalty for this is huge aerodynamic drag, but on a track with no long straights, that penalty is irrelevant.
Monza, the “Temple of Speed,” is the complete opposite. It is a circuit defined by immensely long straights connected by a few chicanes. Here, top speed is everything. A high-downforce Monaco-spec wing would be a disaster, acting like a parachute on the straights and making the car painfully slow. So, teams run a “low-downforce” setup. The wings are trimmed to be almost flat. This drastically reduces drag, allowing the car to achieve maximum straight-line speed, which is essential for both fast laps and overtaking. The trade-off is that the car has far less grip in the corners, feeling slippery and nervous. The drivers must wrestle the car through the chicanes, knowing they’ll make up the time on the next straight. It’s the perfect illustration that in performance engineering, there is no single “best” setup—only the optimal compromise for the task at hand.
Why F1 Cars Create ‘Dirty Air’ That Ruins Overtaking?
We’ve seen how F1 wings are masterfully shaped to generate downforce, but this powerful effect has a significant and problematic side effect: “dirty air.” This is the highly turbulent, chaotic wake of air that trails behind a fast-moving F1 car. While the wings and floor of the car are brilliant at managing the airflow for their own benefit, the air they leave behind is a swirling mess, completely stripped of its energy and consistency.
This creates a major problem for a following car. Aerodynamic components, especially the front wing, are designed to work in smooth, “clean” air. When a car drives into the dirty air of a car in front, its own wings suddenly become much less effective. The turbulent air can’t be channeled properly, and the result is a dramatic loss of downforce, particularly at the front of the car. Drivers report this as a sudden loss of front-end grip, causing understeer and making the car feel like it’s skating on the surface.
This phenomenon is the primary reason why overtaking can be so difficult in F1. A driver might be faster than the car ahead, but as soon as they get close enough to attempt a pass in a corner, they enter the dirty air, lose downforce, and have to back off to avoid sliding off the track. They are stuck. This illustrates a fascinating paradox of performance engineering: the very tools that make an individual car incredibly fast (its complex aerodynamics) are also what can make the overall race less competitive by preventing close wheel-to-wheel action. It’s a constant battle for the sport’s rule-makers, who are always trying to find ways to reduce the impact of dirty air to promote better racing.
Now that you understand the complex trade-offs involved in every performance component, the next step is to apply this thinking to your own vehicle. A clear, honest assessment of your driving—how much time is spent on the road versus the track—is the only way to select the right components that will truly enhance your experience.